사전 세팅
pom.xml =>스프링 버전 수정(5.0.7), Lombok 추가, test추가, 서블릿 버전 삭제 및 수정(3.1.0), Maven 버전 수정(1.8)
=>update project 실행
*pom.xml은 Maven이 사용하는 빌드 파일(빌드 정보를 기술)
path를 /로 변경해줌(절대경로)
1.tomcat server에서 Path변경
2.Properties에서 Web Progect Settings의 root변경
(지시서)
*톰캣 구동 관련
web.xml
*스프링 관련
root-context.xml : 일반 Java역역
servlet-context.xml : Web관련 영역
web.xml
<?xml version="1.0" encoding="UTF-8"?>
<web-app version="2.5" xmlns="http://java.sun.com/xml/ns/javaee"
	xmlns:xsi="http://www.w3.org/2001/XMLSchema-instance"
	xsi:schemaLocation="http://java.sun.com/xml/ns/javaee https://java.sun.com/xml/ns/javaee/web-app_2_5.xsd">

<!-- context-param,listener태그 : RootApplicationContext 생성 -->
	<!-- root-context.xml의 경로 설정 -->
	<context-param>
		<param-name>contextConfigLocation</param-name>
		<param-value>/WEB-INF/spring/root-context.xml</param-value>
	</context-param>

	<!-- 스프링 MVC의 *ContextLoaderListener 등록 -->
	<listener>
		<listener-class>org.springframework.web.context.ContextLoaderListener</listener-class>
	</listener>

<!-- servlet태그 : WebApplicationContext 생성 -->
	<servlet>
		<servlet-name>appServlet</servlet-name>
		<servlet-class>org.springframework.web.servlet.DispatcherServlet</servlet-class>
		<init-param>
			<param-name>contextConfigLocation</param-name>
			<param-value>/WEB-INF/spring/appServlet/servlet-context.xml</param-value>
		</init-param>
		<load-on-startup>1</load-on-startup>
	</servlet>

	<servlet-mapping>
		<servlet-name>appServlet</servlet-name>
		<url-pattern>/</url-pattern>
	</servlet-mapping>

</web-app>
*contextloaderlistener : RootApplicationContext를 생성하는 클래스
RootApplicationContext : 최상위 ApplicationContext. 부모 Context이며 자식에게 자신의 설정을 공유한다. 단, 자신은 자식인 WebApplicationContext의 설정에 접근하지 못한다.
WebApplicationContext : Servlet 단위의 ApplicationContext이다. RootApplicationContext의 자식 Context이며, 부모인 RootApplicationContext의 설정에 접근할 수 있다.
ApplicationContext => WebApplicationContext
같이 연동되는 방식으로 동작하기 때문에 설정을 분리해도 통합해서 사용가능
스프링 MVC
| 서블릿 | 스프링 Controller |
| 클래스에서 URL 분기 | 클래스 혹은 메서드에서 가능 |
| GET/POST는 메서드 선택과 override | @GetMapping/@PostMapping등 |
| 고정된 파라미터와 리턴 타입 | 파라미터의 자동수집 상황에 따른 반환 타입 조정 |
| 수동으로 직접 forward | 자동으로 forward처리 |
| 의존성 주입 불가 | 스프링을 통해서 다른 객체 주입 |
| JSON등의 처리의 불편함 | @RestController |
| 기타 어노테이션을 통한 많은 기능 지원 | |
| 다양한 뷰 처리 기능 |
기본 흐름
web.xml > (servletContext) > HomeController.java > Home.jsp
*web.xml : 프젝 시작(root-context)
root-context : 객체(Bean)동작
DispatcherServlet : servlet.xml로딩, 해석(request를 받음)
servlet-context : root-context의 객체들과 연동
rootContext : Spring에서 쓸 bean생성
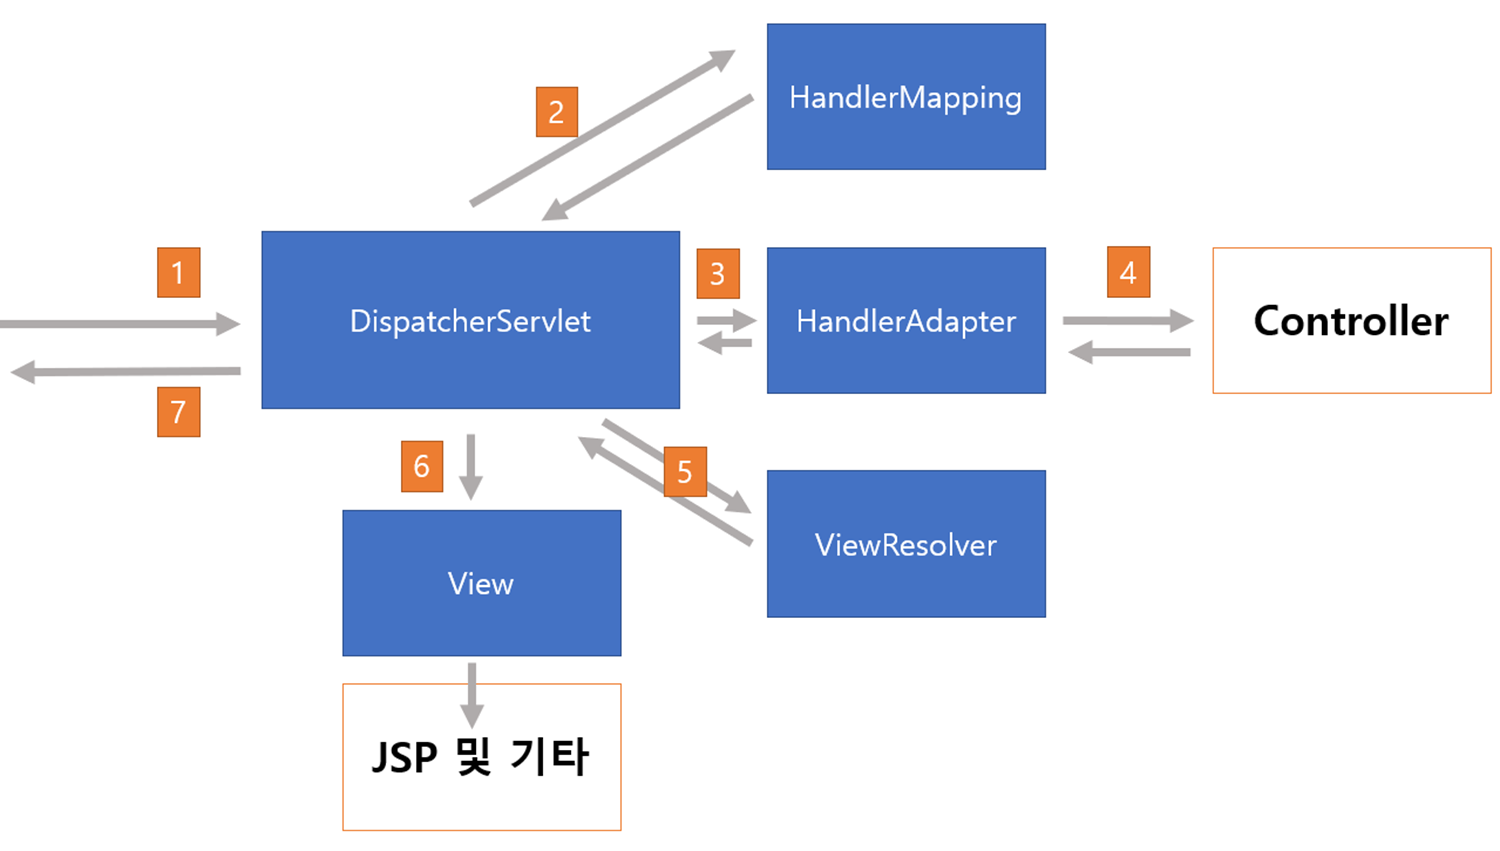
Controller : 개발자가 작성. request를 처리해줌(model에 담아서 전달)
ViewResolver : Controller에서 반환되는 결과를 받음.(jsp로 연결해줌! 때문에 jsp가 없는 경우 페이지에는 404오류가 뜸)
DispatcherServlet : request를 받음
View : 실제로 응답보내야 하는 데이터를 생성
예제
ex1) 메소드에서 DTO를 사용
@Data
public class SampleDTO {
	private String name;
	private int age;
}
/sample/ex01로 접속해보면 찍힌 log를 통해 dto의 객체들을 잘 받고있음을 알 수 있다.
/sample/ex01?name=shin&age=5 와 같은 방식으로 파라미터를 추가해줄 수 있다.(자동으로 타입을 변환해서 처리해줌)
@Controller
@RequestMapping("/sample/*")
@Log4j
public class SampleController {
//앞으로 나오는 예제에 클래스가 없는 코드는 모두 위와 같은 클래스임~~

	@RequestMapping("/ex01")
	public String ex01(SampleDTO dto) {
		log.info("" + dto);
		return "ex01";
	}

//SampleDTO(name=null, age=0)
//SampleDTO(name=shin, age=5)
ex2) 파라미터의 타입을 따로 선언
파라미터의 타입을 따로 선언해줄 수도 있다.(변수명과 파라미터명이 다른 경우 유용)
	//단일값으로 받았을 때
	@RequestMapping("/ex02")
	public String ex02(@RequestParam("name") String name, @RequestParam("age") int age) {
		log.info("name : " + name);
		log.info("age : " + age);
		return "ex02";
	}
//name : shin
//age : 5
ex3) 동일한 이름의 파라미터를 여러개 전달
/sample/ex02List?ids=shin&ids=5&ids=22kg
같은 이름의 여러 파라미터가 전달되더라도 배열의 형태 ArrayList<>로 자동 수집됨.
	@GetMapping("/ex02List")
	public String ex02List(@RequestParam("ids") ArrayList<String> ids) {
		log.info("ids : " + ids);
		return "ex02List";
	}
//ids : [shin, 5, 22kg]

	@GetMapping("/ex02Array")
	public String ex02Array(@RequestParam("ids") String[] ids) {
		log.info("ids : " + Arrays.deepToString(ids));
		return "ex02Array";
	}
//ids : [shin, 5, 22kg]
ex4) 객체타입을 여러개 처리하기
@Data
public class SampleDTOList {
	private List<SampleDTO> list;
	public SampleDTOList() {
		list = new ArrayList<>();
	}
}
파라미터로 값을 전달해주는데, list[0]은 list%5B0%5D로 표현한다.
/sample/ex02Bean?list%5B0%5D.name=shin&list%5B0%5D.age=5&list%5B1%5D.name=chan&list%5B1%5D.age=9
	@GetMapping("/ex02Bean")
	public String ex02Bean(SampleDTOList list) {
		log.info("list dtos" + list);
		return "sample/ex02Bean";	//ex02Bean.jsp로 이동
	}
//SampleDTOList(list=[SampleDTO(name=shin, age=5), SampleDTO(name=chan, age=9)])
ex5) 파라미터로 Model타입 전달하기
request.setAttribute("serverTime", new java.util.Date()); 같은 기능.
Model타입으로 선언하면 스프링에서 자동으로 Model타입의 객체를 만들어줌
Model에 담는 데이터는 파라미터가 아니라 다른 곳에서 발생한 데이터를 담기 위한 공간임!
(ex.페이징할 번호는 파라미터로 전달되지만, 결과 데이터를 전달하려면 Model에 담아서 전달함.)
public String home(Model model) {
    model.addAttribute("serverTime", new java.util.Date());
    return "home";
}
ex5-1) 강제로 전달받은 파라미터를 Model에 담아서 전달하기
@ModelAttribute 어노테이션 이용
@ModelAttribute이거 안붙여주면 값이 컨트롤러까지는 오는데 jsp에는 안찍힘
	  @RequestMapping("/ex04")		//ModelAttribute적어줘야 page까지 전달댐
	  public String ex04(SampleDTO dto, @ModelAttribute("page") int page) {
	    log.info("dto: " + dto);
	    log.info("page: " + page);
	    return "/sample/ex04";
	}
//ex04.jsp
<body>
<h2>SAMPLEDTO ${sampleDTO}</h2>
<h2>PAGE ${page}</h2>
</body>
ex6) JSON 타입으로 전달받기
먼저 pom.xml에 jackson-databind라이브러리를 추가해주어야 한다.
	  @RequestMapping("/ex06")
	  public @ResponseBody SampleDTO ex06() {
	    log.info("/ex06..........");
	    SampleDTO dto = new SampleDTO();
	    dto.setAge(10);
	    dto.setName("홍길동");
	    return dto;	//ex06.jsp는 없지만 화면에 dto객체가 반환됨. JSON형태로....,,,
	  }
 //return타입이 SampleDTO이므로 앞에 @ResponseBody 붙여줬음
ex7) 프론트에 값 넘겨주기
ResponseEntity : 결과값, 상태코드, 헤더값을 모두 프론트에 넘겨줄 수 있고, 에러코드 또한 섬세하게 설정해서 보내줄 수 있다(https://thalals.tistory.com/268)
	  @GetMapping("/ex07")
	  public ResponseEntity<String> ex07(){
		  log.info("/ex07............");

		  String msg = "{\"name\": \"홍길동\"}";

		  HttpHeaders header = new HttpHeaders();
		  header.add("Content-Type", "application/json;charset=UTF-8");
		  	return new ResponseEntity<>(msg, header, HttpStatus.OK);
	  }
 //{"name": "홍길동"}
ex8) 파일 업로드
commons-fileupload 라이브러리를 추가해 준다.
pom.xml
		<!-- https://mvnrepository.com/artifact/commons-fileupload/commons-fileupload -->
		<dependency>
			<groupId>commons-fileupload</groupId>
			<artifactId>commons-fileupload</artifactId>
			<version>1.4</version>
		</dependency>
C:/upload/tmp 폴더를 생성해주고
파일을 처리할 bean을 만들어 준다.(*id="multipartResolver")
servlet-context.xml
	<beans:bean id="multipartResolver" class="org.springframework.web.multipart.commons.CommonsMultipartResolver">
    <beans:property name="defaultEncoding" value="utf-8"></beans:property> 한글이름 처리
    <!-- 1024 * 1024 * 10 bytes  10MB -->
    <beans:property name="maxUploadSize" value="104857560"></beans:property> 한번에 전달될 수 있는 최대 크기
    <!-- 1024 * 1024 * 2 bytes  2MB -->
    <beans:property name="maxUploadSizePerFile" value="2097152"></beans:property> 하나의 파일 최대 크기
    <beans:property name="uploadTempDir" value ="file:/C:/upload/tmp"></beans:property>  임시 저장
    <beans:property name="maxInMemorySize" value="10485756"></beans:property> 메모리에 유지되는 최대 크기
파일을 업로드 할 페이지 생성
src/../view/sample/exUpload.jsp
<%@ page language="java" contentType="text/html; charset=UTF-8"
    pageEncoding="UTF-8"%>
<html>
<head>
<meta http-equiv="Content-Type" content="text/html; charset=UTF-8">
<title>Insert title here</title>
</head>
<body>

<form action="/sample/exUploadPost"  method="post" enctype="multiPart/form-data">

 <div>
   <input type='file' name='files'>
 </div>
 <div>
   <input type='file' name='files'>
 </div>
 <div>
   <input type='file' name='files'>
 </div>
 <div>
   <input type='file' name='files'>
 </div>
 <div>
   <input type='file' name='files'>
 </div>
 <div>
   <input type='submit'>
 </div>
</form>
</body>
</html>
첨부한 파일의 정보가 로그에 잘 찍히는 것을 확인 할 수 있다.
	  @PostMapping("/exUploadPost")
	  public void exUploadPost(ArrayList<MultipartFile> files) {
		  files.forEach(file ->{	//람다식(함수형 언어 표기법. 매개변수(file)를 함수로 전달함)
			  log.info("-------------------------");
			  log.info("name:"+file.getOriginalFilename());
			  log.info("size:"+ file.getSize());
			  log.info("type:"+ file.getContentType());
		  });
	  }
ex9) 예외 처리
servlet-context.xml에 추가
	<context:component-scan base-package="org.zerock.exception" />
    <!-- 클래스들을 스캔하여 빈으로 등록해준다.(해당 패키지의 내용을 조사하게 함) -->
오류 내용에 따라 jsp로 연결된다
import org.springframework.http.HttpStatus;
import org.springframework.ui.Model;
import org.springframework.web.bind.annotation.ControllerAdvice;
import org.springframework.web.bind.annotation.ExceptionHandler;
import org.springframework.web.bind.annotation.ResponseStatus;
import org.springframework.web.servlet.NoHandlerFoundException;

import lombok.extern.log4j.Log4j;

@ControllerAdvice	//해당 객체가 스프링의 컨트롤러에서 발생하는 예외를 처리하는 존재임을 명시
@Log4j
public class CommonExceptionAdvice {

  @ExceptionHandler(Exception.class)//모든 exception을 처리
  public String except(Exception ex, Model model) {

    log.error("Exception ......." + ex.getMessage());
    model.addAttribute("exception", ex);
    log.error(model);
    return "error_page";
  }

  @ExceptionHandler(NoHandlerFoundException.class)	//해당 exception만 처리
  @ResponseStatus(HttpStatus.NOT_FOUND)
  public String handle404(NoHandlerFoundException ex) {
	  return "custom404";
  }
}
'스프링' 카테고리의 다른 글
| Spring CRUD (0) | 2022.10.21 |
|---|---|
| Spring JDBC (0) | 2022.10.20 |
| Spring MyBatis (0) | 2022.10.18 |
| Spring JDBC (0) | 2022.10.18 |
| Spring 어노테이션 (0) | 2022.10.17 |